
The task this week was to get a better understanding of the electrics installed in the van, some of the labels had rubbed off the Zig unit so it was impossible to know what did what.
I downloaded the MC-2000 wiring diagram from the VW T25/T3 Autosleeper Info Site, which shows the following:

Note: Sir Adventure is a 1991 Autosleeper conversion.
To work out what setup was installed in the van I went on the hunt for the ZIG DCU-3 and a split charge relay.
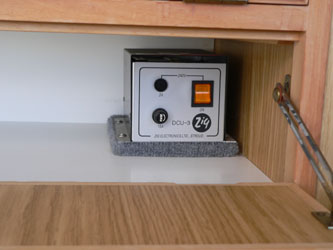
ZIG DCU-3
I knew I had a Leisure Battery (under the passenger seat) but was unsure whether the van was fitted with a ZIG DCU-3 charging unit. A quick Google search and i’m on the hunt for one of these:
I checked all the cupboards and couldn’t find one so the blue wires do not apply to Sir Adventure. This means that when a 240V electrical hookup is used it will power the Fridge and 13 Amp Socket, but not charge the Leisure Battery.
Note: Another indication of whether you have a DCU-3 or not is the presence of a fourth LED on the front panel above the “Fridge is running on 12V” LED. This comes on to indicate charging.
Split Charge Relay
As the van has a Leisure battery I was pretty sure there would be a Split Charge Relay somewhere (how else would the battery get charged?).
I followed the red cable from the Leisure battery positive terminal, under the van (where it ran parallel to a blue cable) and back inside next to the Vehicle battery where I found the Split Charge Relay. It looks like this (the grey square thing):

The blue cable I mentioned earlier comes from the Alternator in the engine bay, this wire triggers the relay into action. When the engine is on the Alternator charges the Vehicle battery (via the big fat cable connected to the positive terminal), with the relay engaged current can flow between both batteries, charging both.
Fuses
On the inside of the fuse panel is a handy sticker detailing what fuse does what. This turned out to be spot on. (AUX 1 is for the Propex blown heater).

Removing the Zig unit
To understand what was happening behind the Zig unit I took the front of the unit off. It is very straightforward, there are plastic covers on either side which slide off to reveal two Phillips screws. Undoing these lets whole unit comes free.


")

The main connector block has only 9 terminals, further confirmation that there was no DCU-3 unit or extractor fan in Sir Adventure.
The green wire into the terminal block does not lead onto anything, I could connect another accessory here such as a USB socket and take advantage of the AUX 2 fuse.
Wiring Diagram
With the above knowledge I updated the Wiring Diagram to reflect my setup:

One major difference is the common earth block comes off the Vehicle battery, not the Leisure battery.
Zig MC-2000 Labelling
As mentioned earlier, some of the labels had rubbed off. To give a clear understanding of what button does what (and does not disappear with age) I have created a digital version of the Zig MC-2000 faceplate:

")
If you wish to download high resolution versions (right-click and save as):
Full Wiring
After all my poking around i’m left with the diagram below. I have combined the Zig unit with the updated Wiring Diagram and linked the colour matched wiring to the correct terminal points. (Zig unit lightened for clarity).
It’s easy to understand how the 12V on/off switch controls all current through the fuses.

Download the Zig MC-2000 Full Wiring Diagram as a PDF.

Excellent information. As a green horn can you tell me which plug I can use in the cigarette type socket.
LikeLike
It’s a DIN/Hella socket. I bought a DIN Plug to Standard Lighter Socket Adaptor so I could still use if needed. (I changed the original light socket to a USB one).
LikeLike
As we are now the owners of a VW T25 Trooper you information’s great but can you help us with the switches under “12 Volt”? The left side switch has “12v” above it and “ON” below. If I put the switch to “ON” will it run from the site and/or leisure battery and if the switch is at 12v the engine battery? Only reason I ask is had a dead engine battery and unsure if we had left the Zig MC-2000 on the wrong setting. Many thanks.
LikeLike
Did you ever find this out?
LikeLike
Hi John, have you had any luck with this
I am in the same boat, I contacted previous owner and he said he always left it in the up position when not in use. He then also said he had to charge the battery or jump start if unused for a few days to a week. He figured something else was draining the main battery. I’m unsure and cant find any answers. Logic tells me not to leave it in the ON position, bit you never know.
LikeLike